WP 佈景主題引入 TailwindCSS
· 4 min read

✨前言
在上一篇 建立 WP 空白的佈景主題 ,已經建立乾淨的空白主題
接下來,我想導入Tailwind CSS到這個佈景主題中
我就問Gemini要怎麼做,原本以為是個簡單任務
沒想到,一直碰到鬼打牆,拿舊的(3.x)設定方式當回覆
也是弄了兩三個小時,才得拼湊出正確的設定
建立最簡佈景主題骨架 (Minimal Theme Setup)
首先,您需要一個新的資料夾和三個最基本的 WordPress 佈景主題檔案。
1. 建立主題資料夾
在您的 WordPress 安裝目錄中,進入 wp-content/themes/,然後建立一個新的資料夾
例如命名為 my-tailwind-theme。
2. 建立 style.css (佈景主題標頭)
這是 WordPress 識別佈景主題所必需的檔案。在 my-tailwind-theme 資料夾內建立 style.css,並加入以下內容:
/*
Theme Name: My Tailwind Theme
Theme URI: [你的網站 URL]
Author: [你的名稱]
Author URI: [你的網站 URL]
Description: A custom WordPress theme built with Tailwind CSS.
Version: 1.0
Text Domain: my-tailwind-theme
*/

/* 這是 WordPress 的主樣式表,但我們將使用編譯後的 Tailwind CSS */
3. 建立 index.php (佈景主題主檔案)
這是佈景主題的入口點。建立 index.php,並加入基本的 HTML 結構和 WordPress 函式:
<?php
/**
* The main template file.
*/
?>
<!DOCTYPE html>
<html <?php language_attributes(); ?>>
<head>
<meta charset="<?php bloginfo( 'charset' ); ?>">
<meta name="viewport" content="width=device-width, initial-scale=1">
<?php wp_head(); ?>
</head>
<body <?php body_class( 'text-gray-900 bg-white' ); ?>>
<header class="bg-blue-500 p-4 text-white">
<h1 class="text-2xl font-bold"><?php bloginfo( 'name' ); ?></h1>
</header>
<main class="container mx-auto p-4">
<h2 class="text-xl mb-4">歡迎來到我的 Tailwind WordPress 主題!</h2>
<?php
if ( have_posts() ) {
while ( have_posts() ) {
the_post();
?>
<article class="p-4 border border-gray-200 rounded-lg mb-4">
<h3 class="text-lg font-semibold"><?php the_title(); ?></h3>
<div class="text-sm text-gray-600"><?php the_content(); ?></div>
</article>
<?php
}
} else {
echo '<p>沒有文章可顯示。</p>';
}
?>
</main>
<footer class="bg-gray-800 p-4 text-white text-center">
<p>© <?php echo date('Y'); ?> <?php bloginfo( 'name' ); ?></p>
</footer>
<?php wp_footer(); ?>
</body>
</html>
4. 建立 functions.php (註冊樣式)
這個檔案用來告訴 WordPress 載入你的樣式檔案。建立 functions.php,並加入以下內容:
<?php
/**
 * Theme functions and definitions
 */

if ( ! function_exists( 'my_tailwind_theme_scripts' ) ) {
	/**
	 * Enqueue styles and scripts.
	 */
	function my_tailwind_theme_scripts() {
		// 載入編譯後的 Tailwind CSS 檔案
		wp_enqueue_style( 'my-tailwind-theme-style', get_template_directory_uri() . '/dist/style.css', array(), '1.0' );

		// 載入 WordPress 預設的 style.css (僅用於讀取主題標頭)
        wp_enqueue_style( 'my-tailwind-theme-main', get_stylesheet_uri(), array( 'my-tailwind-theme-style' ), '1.0' );

	}
}
add_action( 'wp_enqueue_scripts', 'my_tailwind_theme_scripts' );
如何在 WordPress 佈景主題中導入 Tailwind CSS?
1. 初始化專案環境
你需要具備 Node.js 和 npm (或 Yarn) 的環境。
- 在你的
佈景主題根目錄下,初始化一個 Node.js 專案:
npm init -y
npm install -D @tailwindcss/cli @tailwindcss/postcss
新增 tailwind.config.js (在佈景主題跟目錄下)
// tailwind.config.js
/** @type {import('tailwindcss').Config} */
module.exports = {
    // v4.x 會嘗試自動偵測內容,但您仍然可以在此處提供路徑作為備援
    // content: ["./**/*.php", "./**/*.js"],
    theme: {
        extend: {
            // 您的自訂顏色、字體等...
        },
    },
    plugins: [],
};
src\input.css
@import "tailwindcss";
postcss.config.js
// postcss.config.js
module.exports = {
    plugins: [
        "@tailwindcss/postcss", // 這是 v4.x 整合的唯一插件
    ],
};
2. 修改 package.json 腳本
由於您現在使用 tailwindcss 的執行檔名是 @tailwindcss/cli,您需要修改您的 package.json 腳本來執行它。
請將您的 package.json 中的 scripts 部分修改為:
"scripts": {
  "dev": "npx @tailwindcss/cli -i ./src/input.css -o ./dist/style.css --watch",
  "build": "npx @tailwindcss/cli -i ./src/input.css -o ./dist/style.css --minify"
},
3. 重新執行開發模式
儲存 package.json 檔案後,再次運行您的開發腳本:npm run dev
🖼️成果展示
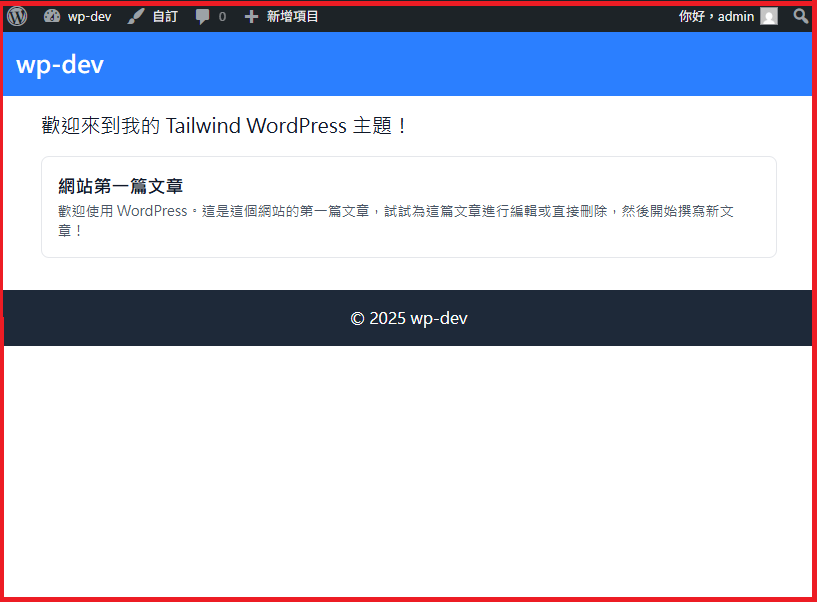
太棒了!您已經成功地設定了現代化的 Tailwind CSS v4.x 開發環境,這是最困難的部分。
現在我們可以專注於開發您的 WordPress 佈景主題結構了。